Fitting smart radiator thermostats
Smart radiator thermostats, or smart TRVs as they are also known, are a fantastic way to upgrade your home heating to a far more efficient system without very much effort!
Smart TRVs are not to be confused with smart meters which are often installed for free by your energy provider.
Instead, one of the great things about our smart thermostats is that you can easily install them yourself since they don’t involve changing your plumbing.
But like with any heating DIY job, we would always advise contacting a Gas Safe registered engineer to set everything up for you if you don’t feel confident.
Now, if you’ve done a little smart heating digging, you’re probably familiar with the likes of Tado° smart thermostats and the Nest learning thermostat.
But, the Milano Connect smart TRVs are the strong new contenders in the smart heating game that are not to be underestimated.
Before we get started on installing the Milano Connect smart thermostats, we have answered a couple of your FAQs below:
Milano Connect Smart TRV FAQs:
Do you need to drain the radiator or the whole system to install a Milano Connect smart TRV?
No, you do not need to drain the system or the radiator since the smart thermostat does not replace your current valve or change your pipework. Instead, the Milano Connect smart TRV sits on top of your current valve body.
What if my current valves are not compatible?
The Milano Connect smart radiator thermostats are compatible with all standard radiator valves with a M30 x 1/2” thread including all Milano radiator valves.
But, if your current valves are not standard size you can still install a Milano Connect smart TRV since they are supplied with Danfoss RAV, Danfoss RA and Danfoss RAVL valve adapters to fit other valve models and ensure the smart TRV is compatible.

Are the Milano Connect smart radiator thermostats easy to install?
Yes! Installing a Milano Connect smart radiator valve yourself is a very simple process and no special tools are required. Step by step instructions are also supplied with the valve which we will go through later.
The setup of the App and pairing of the smart TRVs may be a slight issue for people that are not very tech-savvy. But again, there are step by step instructions in the manuals which we will also explain further on. Don’t worry, you got this!
Are Milano Connect smart TRVs Google Home and Amazon Alexa compatible?
Yes, like most other smart heating controls the Milano Connect smart TRVs are compatible with any Wi-Fi connected device including Google Home and Amazon Alexa.
Multiple zones and settings can also be managed within the Smart Life App which is free to download from the App Store and Google Play.
How many smart TRVs can be controlled from the Smart Life App?
Up to 12 Milano Connect smart TRVs can be added to the Wi-Fi hub and connected to the Smart Life App and all smart radiator thermostats in the same room are synchronised.
This means that you can control multiple radiators individually via the app to easily reach your desired room temperature and ensure maximum comfort.
Can Milano Connect smart TRVs be installed in bathrooms?
Yes, the Milano Connect smart TRV heads are battery operated so there is no LVD regulation for installation meaning you can install them in your bathroom without a worry.
However, you should always avoid installing smart TRVs where they were likely to come into direct contact with water spray.


What does the open window detection function do?
The open window detection function is designed to reduce your energy waste even further! When it is enabled, the system will automatically stop heating when a sudden drop in room temperature is detected.
Is the installation process the same for the Milano Connect and the Tado° smart TRV?
Yes, the installation is the same for both types of smart TRVs. However, the set up of the Tado° App and pairing the TRVs to the hub is different.
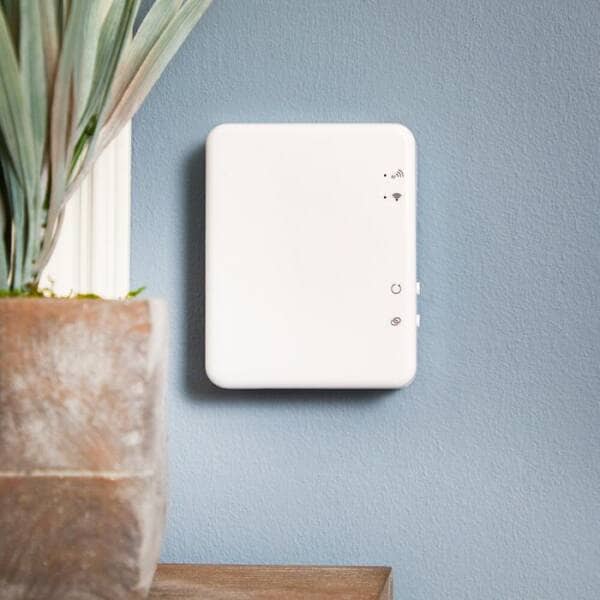
Can you use the Milano Connect smart TRVs with a different Wi-Fi hub?
No, the Milano Connect smart TRVs are configured to only work with the Milano Connect Wi-Fi Gateway Hub.
Can you install the Milano Connect Wi-Fi Gateway Hub yourself?
Yes, just like the smart TRVs, the Milano Connect Wi-Fi gateway hub is really easy to install and set up yourself which we will show you later.
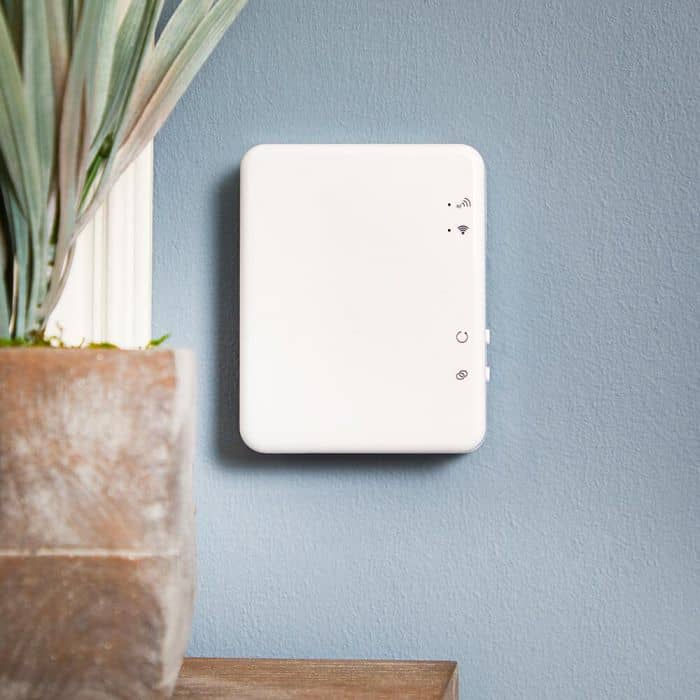
The easiest way to install the gateway hub is simply to plug it in! All you need to do is take the USB lead supplied, attach it to your own UK plug and connect the hub.
The USB lead is the same as a phone charger lead USB to mini USB. This means it will work with most adaptors that are 5 volt and 1 Amp which most phone chargers are.
Or, if you would prefer to keep your Wi-Fi hub out of the way and in a safe place, you can also wall mount the hub and connect it to your nearest mains plug.
What is the metre range from the Milano Connect smart thermostatic radiator valve to the WiFi hub?
100 meter range in an open area. So as long as the hub is in a 100 meter range from your smart TRV, you can install it in any room in your home.
How to install a Milano Connect smart TRV
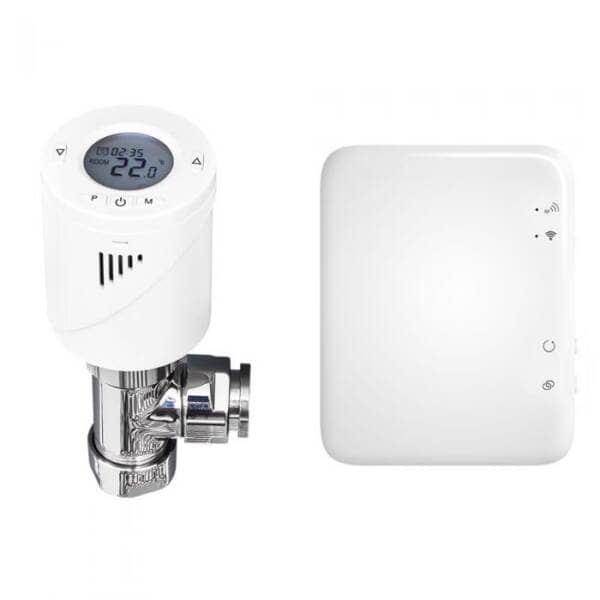
- Milano Connect Smart Radiator Thermostat
- Milano Connect Wi-Fi Gateway Hub
- UK Plug
- 2 screws if wall mounting the Wi-Fi hub

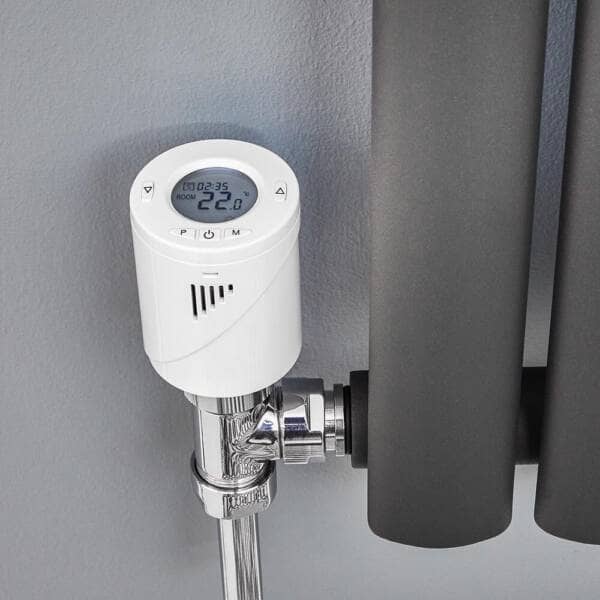
Step 1: Initialize the smart TRV
Put the batteries in the smart TRV to initialise the valve. Once the batteries are installed, the TRV will display INIL and begin to initialize.

Step 2: Install the smart TRV onto your radiator
If you have a compatible valve already installed on your radiator (usually a manual TRV head) you can simply unscrew the manual TRV head and replace with the smart TRV head.
Step 3: Complete the smart TRV initialization
Check the display screen on the smart TRV. Once the TRV has initialized the display will change to AdAP 0.
Step 4: Calibrate the smart TRV
Press the UP button to change 0 to 1. The smart TRV will now calibrate itself to the stroke of your valve body, the plunger in the TRV will move up and down to store the open and closed points of your valve.
Step 5: Wait for the main screen display
Once the TRV has calibrated the main screen will be shown on the display and your Milano Connect smart TRV will be correctly installed.
Next job
If you have followed the steps correctly so far, you should now have installed your first smart TRV. Nice job!
Now let’s get your gateway hub up and running.
How To Setup The Milano Connect Wi-Fi Gateway Hub
Step 1: Plug in the gateway hub
Before you start the setup, make sure to plug your Wi-Fi gateway hub into the socket where you want it to be installed.

Step 2: Connect to Wi-Fi
Ensure your smartphone is connected to your home Wi-Fi network.
Step 3: Download the Smart Life App
Scan the QR code below or search the Smart Life App from Google Play store or Apple Store. Download the Smart Life App.

Step 4: Register your account
If this is the first time to use the Smart Life App then tap ”Register” and follow the instructions on screen to register your account.
Step 5: Add the device
Open the App and press the “ + ” button on the upper right corner to add the device.
Step 6: Connect the gateway hub
On the app, press “Others”, then press “Connector (Wi-Fi)” icon. Then, press the Wi-Fi connection button on the Milano Connect Wi-Fi Gateway Hub and hold until LED 2 begins to flash quickly (2 per second).

Step 7: Add your Wi-Fi password
Select “Confirm indicator rapidly blink” on the App and add your Wi-Fi password when prompted.
Step 8: Complete the connection
Wait a moment until the connection is complete.
Next job
Please note: Before you move on and start pairing the smart TRV to the App, please make sure you have added the Milano Connect Wi-Fi Gateway Hub that we went through in the last section.
How To Pair The Smart TRVs With The Smart Life App
Step 1: Connect the device
Open the App and select the Wi-Fi gateway, press add sub device and then press heater.
Step 2: Turn off the smart TRV
Turn off the smart TRV by pressing the ON/OFF button.
Step 3: Hold the M button
Press and hold the M button until the display shows FF.
Step 4: Make the TRV visible
Press the Up button to enable the TRV to become visible, there will now be three signal lines moving across the top of the display.
Step 5: Confirm indicator rapidly blink
Select “Confirm indicator rapidly blink” on the App.
Step 6: Complete the connection
Wait a moment until the connection is complete.


Milano Connect Smart TRV settings
Mode setting:
- Press the M button to choose
- Manual mode (manual on/off)
Away mode:
- Pre set temperature set when in this mode.
- Please note this temperature can not be set below the Min Set.
Point:
- Default 5°C, this can be changed in the parameter settings, menu 03.
- PRG mode (timer).
Clock & weekday setting:
- Press and hold the P button for 5s, set the clock (Min-Hour-Weekday) by the pressing UP and DOWN buttons, press the P button to move onto the next setting.
7 days programmable setting:
- After the clock has been set, press P to go to PRG schedule setting.
- Set the schedule (Weekday-Period-Start time-Temp.) by pressing the UP and DOWN buttons, press the P button to move onto next setting.

Troubleshooting FAQs
Why can I not control my smart TRV after I have replaced the battery?
- If you need to change the batteries the smart TRV may reset itself and need to be re-connected to the Wi-Fi hub by pairing the TRV again.
The TRV is not responding to the Smart Life App. What should I do?
- Check the batteries are ok.
- Check the Wi-Fi hub is still connected to your home Wi-Fi and the Internet connection is good.
- If all the above are ok, you may need to reset the Wi-Fi hub and re-connect.
Need more info?
We hope this guide has answered your questions and showed you how easy it really is to set up your own efficient smart heating system with the Milano Connect range!
If you still have a few queries and would like some more information about our Milano Connect products, please send an email to info@bestheating.com and we will get back to you as soon as we can.
And don’t forget to check out the full range of Milano radiator valves and accessories at BestHeating

Milano Connect – Smart Radiator Thermostat Starter Kit

Milano Connect – Smart Radiator Thermostat

Milano Connect – Wi-Fi Gateway Hub for Smart Radiator Thermostat
Jess has a passion for interior design and wants to inspire people to look at radiators as home decor. She enjoys keeping on top of the latest design and heating trends to ensure the Advice Centre has all the information and inspiration homeowners need to make the best choice for them.


