What we’ll cover…
- Required tools for installation: Essential tools needed to dress and hang a horizontal column radiator.
- Preparation steps: Instructions to drain the heating system and prepare the radiator.
- Installation process: Detailed steps to insert plugs, wrap valve spigots, and fix brackets.
- Ensuring proper alignment: Tips to ensure the radiator is level during the installation process.
- Professional assistance: When to consider using a professional service for installation help.
Tips to hang a horizontal radiator
A classic column radiator can make all the difference to the look and feel of your home.
The cast iron style design complements the beauty of period properties, adds character to new builds and of course pumps out plenty of heat!
In this guide, we are going to show you how to dress and hang a column designer radiator.
But remember, if you’re unsure of any part of this installation process, please do not proceed and consult a qualified professional to get the job done for you.
Before you hang your column radiator
Before you dress and hang your column radiator, you will need to drain the heating system.
Visit our guide on how to drain down central heating before you begin.
But first, what does ‘dress a radiator’ actually mean?
‘Dressing’ a radiator is the process of getting it ready for fitting to the wall.
Ready to start dressing and hanging your radiator?
Tools you will need
The tools you will need for this job include:
- Meter ruler or tape measure
- Spirit level
- Drill or impact driver
- PTFE tape
- Adjustable spanner
- Ratchet
- Pencil
- Bleed valve/blank & wall fixing kit (supplied)
With all our radiators, we supply a bleed valve, blank and complete wall fixing kit.

Insert blanking and bleed plugs
Carefully lay your column designer radiator flat and remove the protective rubber bungs.
Screw in the bleed valve and blanking cap and nip them both up with an adjustable spanner.
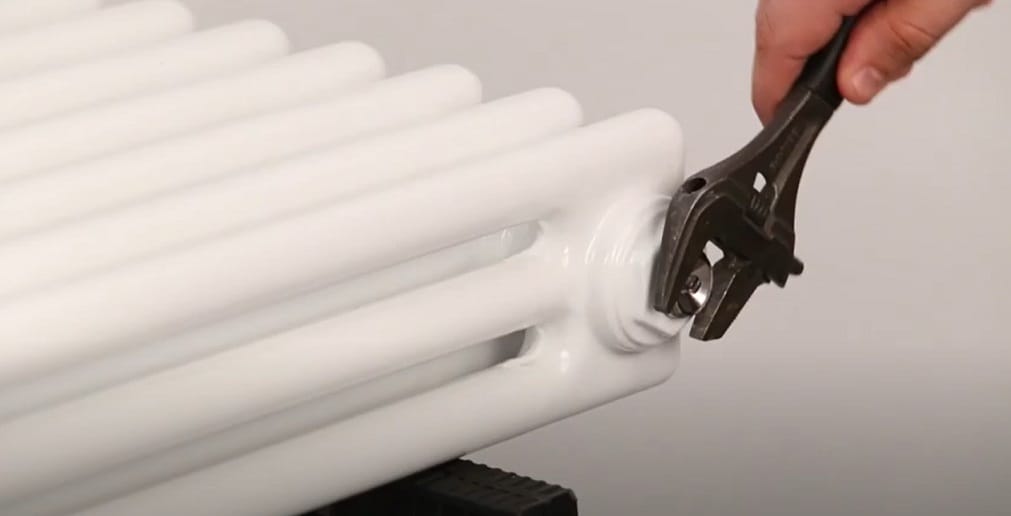
Wrap the valve spigots with PTFE tape
Take your column designer radiator valve spigots and wrap them with PTFE tape around 17 times.
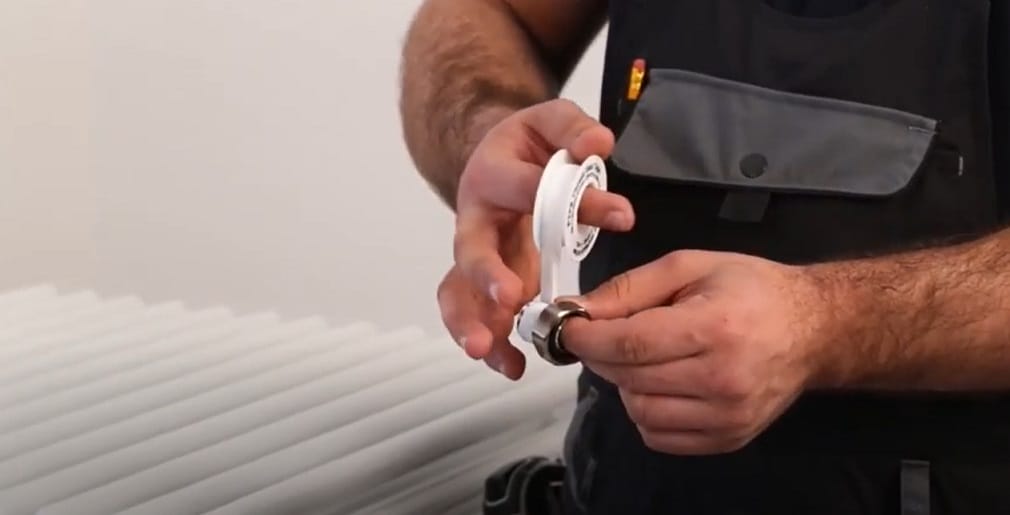
Insert the valve spigots
Fully insert the spigots into your column designer radiator and again nip them up using a ratchet or radiator spanner.

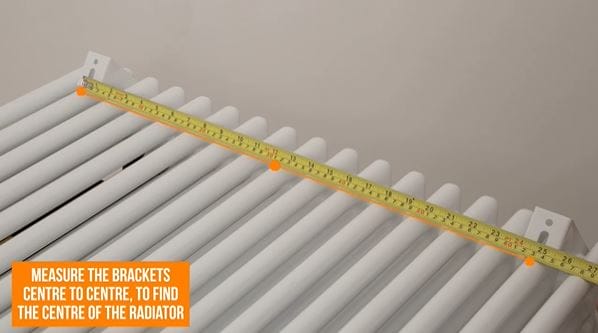
Find the centre of the radiator
Position the bottom brackets loosely and measure the width center to center to find the centre of the radiator.
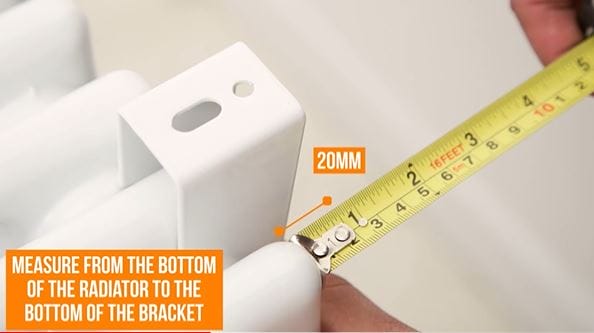
Measure bracket to radiator
Now measure the distance from the bottom of the bracket to the bottom of the radiator.
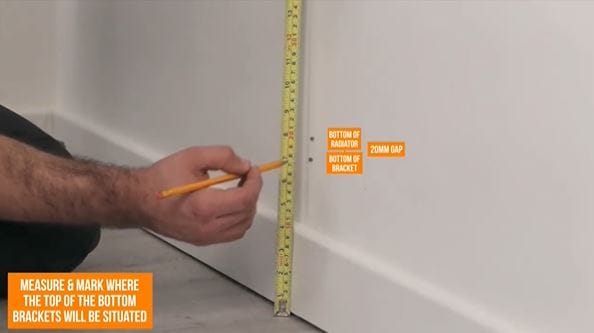
Mark the bottom bracket position
Measure and mark where the top of the bottom brackets will be situated.
Make sure you take into account the distance from the bottom of the bracket to the bottom of the radiator.
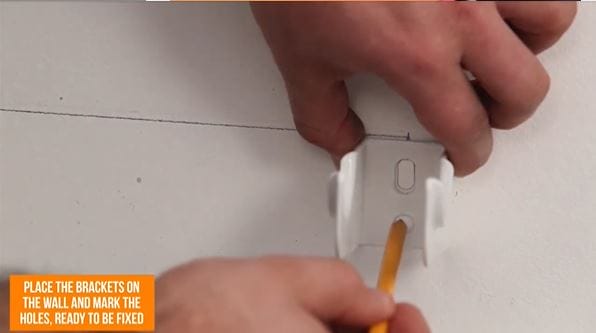
Mark the bracket holes
Place the brackets on the wall and mark the holes ready to be fixed.
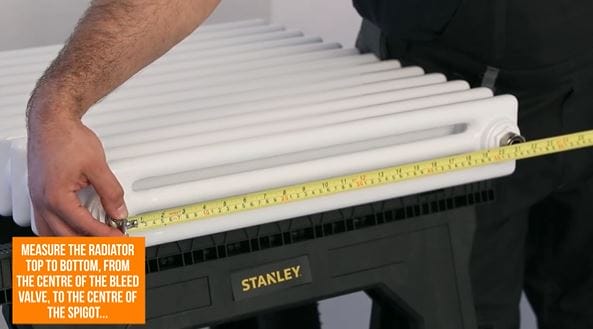
Measure the column designer radiator
Measure the column designer radiator top-to-bottom from the centre of the bleed valve to the center of the spigot.
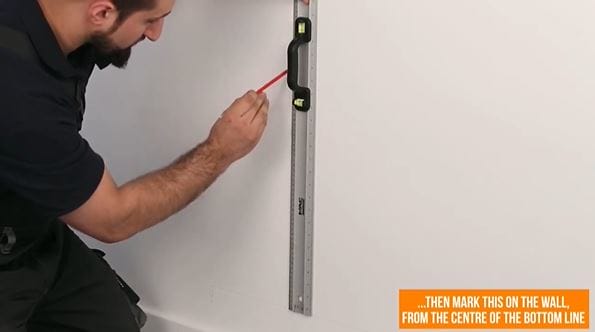
Mark this on the wall
Then mark this on the wall from the center of the bottom line.
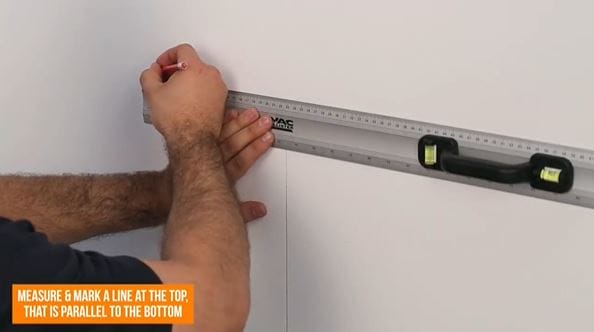
Mark your top bracket position
Measure and mark a line at the top which is parallel to the bottom. This is where your top brackets will be situated.
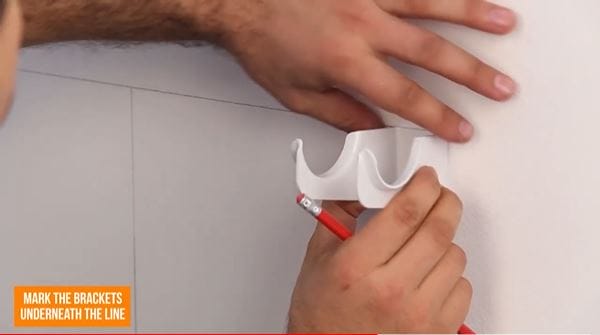
Mark the brackets underneath the line
As with the bottom set, place the top of the bracket below the line and mark the holes ready to be fixed.
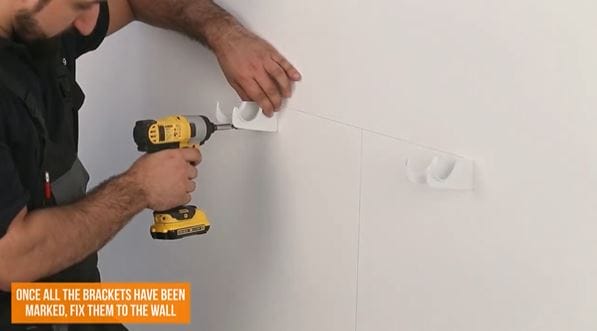
Fix the brackets to the wall
Once all the brackets have been marked, use a drill or impact driver to fix them to the wall using the supplied wall fixing kit.
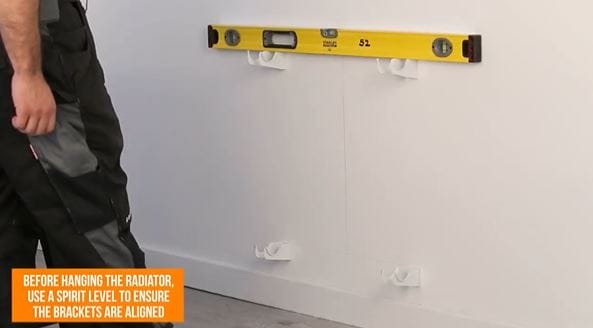
Make sure the brackets are aligned
Before hanging the column designer radiator, use a spirit level to ensure the brackets are aligned.
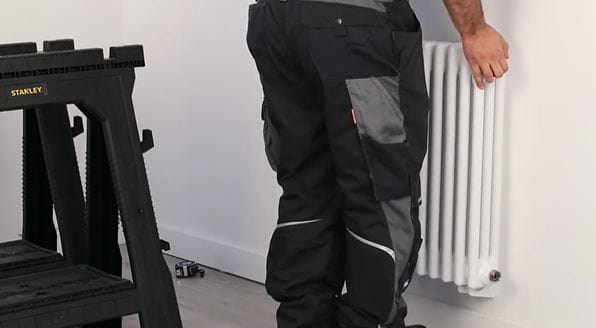
Hang the column radiator
When hanging the column designer radiator please be very careful as they can often be deceptively heavy. Double check the column designer radiator with the spirit level to ensure there’s been no movement when hanging.
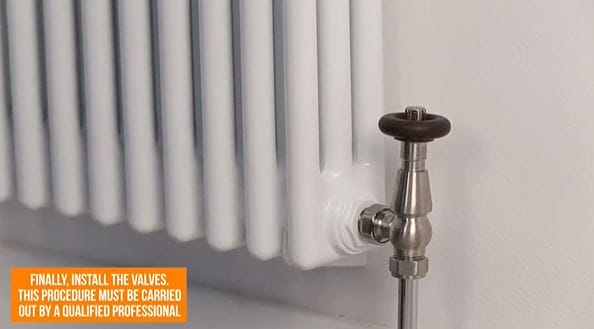
Connect to the central heating
Finally, install the valves and connect your column designer radiator to the central heating system. Please note that this process must be carried out by a qualified professional.
Ready to install your column radiator?
If you’re ready to get the job done, have our full how-to video playing to help you as you go!
Please note: Our ‘how-to’ manuals are intended only as a guide to assist you with common home heating tasks. Please do not attempt to undertake this task if any of the instructions are unclear, or if you are in any doubt about what to do. Instead, seek advice from a professional.
Frequently Asked Questions
Vertical radiators are generally considered to be a more versatile option than their horizontal counterparts for a few reasons. With regards to horizontal radiators, the likeliest prospect is that they are to be installed beneath a window, which will typically be the coldest area of a room. However, with modern properties usually featuring double glazing, the need to place a radiator close to a window is reduced.
And vertical designer radiators present a multitude of possibilities in terms of their fitting location – a tall radiator could feasibly be placed in a narrow gap between pieces of furniture, or to adorn virtually any wall space and create a style statement. As such, the profile of vertical radiators present any buyers with the scope to adjust the layout of their room, whether it be a kitchen, bedroom, bathroom or living area, as opposed to simply performing a straight swap in the same spot with horizontal rads.
Plus, the obvious space-saving element associated with vertical radiators ensures extra versatility in comparison with horizontal versions.
To find out more, take a look at our dedicated blog, Vertical radiators – Pros & cons.
Horizontal radiators can often be considered a good kitchen radiator option, many times in instances where there is adequate space beneath a window or a kitchen worktop.
There’s plenty of advice and inspiration to be found in our Kitchen Radiator and Heating Guide surrounding the very best kitchen radiator ideas to consider for your home.
Vertical central heating radiators tend to perform less efficiently than horizontal radiators, considering they don’t span the same length to draw up cold air for convection as horizontal models do.
However, there are several vertical central heating radiator designs that will adequately warm up a room, depending of course on the size and layout of the space.
For a more detailed insight into the best options to add to your home, explore our dedicated blog, Top 5 Vertical Central Heating Radiators.
Provided that the radiator you opt for delivers an adequate heat output to warm the space, you can choose whether to have a horizontal or vertical radiator in your chosen room.
Typically, vertical radiators will prove an excellent option for compact rooms where space is at a premium, considering horizontal radiators usually take up a lot more wall space.
Essentially though, the choice between vertical and horizontal radiators will be based on what fits your personal preferences, and looks and fits best within your specific room.
Be sure to use our BTU Calculator to guarantee that any radiator you select, vertical or horizontal, offers a strong enough heat output to warm your room to a comfortable temperature.
Jess has a passion for interior design and wants to inspire people to look at radiators as home decor. She enjoys keeping on top of the latest design and heating trends to ensure the Advice Centre has all the information and inspiration homeowners need to make the best choice for them.