Contents
ToggleWhat we'll cover...
All the key information around adding a radiator to an existing system, with hints and tips on what you need to begin with, as well as installation pointers and mistakes to avoid.
Key advice for a fresh radiator addition
Adding a new radiator might not sound like the most rock ’n’ roll home improvement project, but when winter hits and your living room no longer feels like a walk-in freezer, you’ll definitely feel it wasn’t a waste of time.
No matter if you’re chasing cosy comfort or interior design glory, installing a radiator on an existing system is entirely doable, but only if you have some idea where to start. In this guide, we’ll cover the key considerations, common pitfalls, and real-world tips to help you nail the job first time round.

Assessing your current heating system
Before you reach for your pipe cutter or order a chic anthracite radiator, you’ve got to answer a simple but essential question: can your current system handle it?
Adding a new radiator isn’t merely about bolting something stylish to the wall. It needs to work in harmony with the rest of your setup, as it relates to boiler output, flow rates, pressure, and system balance.
How many radiators can your boiler support?
Every boiler has a maximum output capacity, which is typically measured in kilowatts (kW). This output determines how many radiators it can heat up efficiently without kicking up a storm in protest.
- A combi boiler with 24kW output could support up to 10 average-sized radiators.
- Larger systems (35kW+) can often manage somewhere between 15 and 20 radiators – assuming they’re not all the size of a goalpost.
- Be sure to factor in the distribution of radiators by floor too. For instance, a house with several upstairs radiators but only few downstairs radiators may need a boiler with a higher capacity to ensure an appropriate level of heat is distributed to the lower level.
You can use our BTU calculator to determine the heating requirement of the room you want to upgrade. Then compare the total demand against your boiler’s capabilities. If you’re adding a radiator in a large, open-plan kitchen, for example, it could cause a significant jump in system load.

Are your current radiators effective?
Most commonly, working out whether your current radiators are effective will depend on factors such as their condition, age, and compatibility with the overall heating system. Radiators that have been installed for 15-20 years can often prove susceptible to issues such as sludge build-up and reduced heat transfer capabilities, whilst outdated materials and even the insulation properties of a home could influence the effectiveness of your radiators’ performance.
Some tell-tale signs that radiators aren’t working to their full capacity are cold spots on specific radiators, uneven heating throughout the room, and increasing energy bills. Meanwhile, more obvious indicators that are easier to spot include radiators making noise and visible rust or leakage.
That said, sometimes, replacing radiators can be an unnecessary task to take on if some simple tweaks might lead your current models to work at their optimal capacity.
If your existing radiators are underperforming, fixing them might solve your heat issues:
- Bleed radiators to remove trapped air
- Balance the system so heat is evenly distributed between multiple radiators
- Flush sludge build-up using a power flush or chemical cleaner
Preparing for radiator installation
Planning is everything. Get this part wrong and you could end up with a stunning designer radiator that doesn’t heat up, leaks at the radiator valves, or makes your boiler sound like it’s simmering a kettle full of gravel.
Positioning and style
Where you position your new radiator can impact not only heat distribution, but how good the room feels overall.
Positioning tips:
- Install radiators beneath windows to combat cold draughts (especially in older properties)
- Avoid fitting behind large furniture such as settees – that heat will not be able to escape
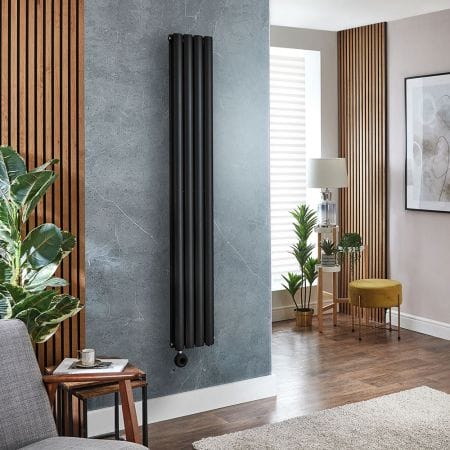
- Don’t cram tall vertical radiators into tiny corners purely for the aesthetic appeal. Find more detailed hints in our guide, How to dress and hang a vertical radiator
Style matters also – column radiators, flat panel rads, vertical styles, heated towel rails – there’s a look for every room. But always keep in mind: style should never compromise BTU output. If it looks amazing but barely warms your socks, it’s not doing its job. So it is imperative to strike the right balance between style and performance when it comes to adding new radiators on an existing heating system.
Bear in mind the available wall space and necessary heat output when coming to your decision. As a general rule of thumb, vertical radiators will work best in smaller spaces where wall room is limited, such as bathrooms, bedrooms or narrow hallway areas, with their space-saving design and respectable heat output capabilities.
By contrast, horizontal radiators could usually be considered a more viable option for larger rooms where wall space may not be at such a premium. Their profile typically lends itself to installation in the most optimal position too – beneath a window.
System compatibility
You’ll want to check your existing heating pipework:
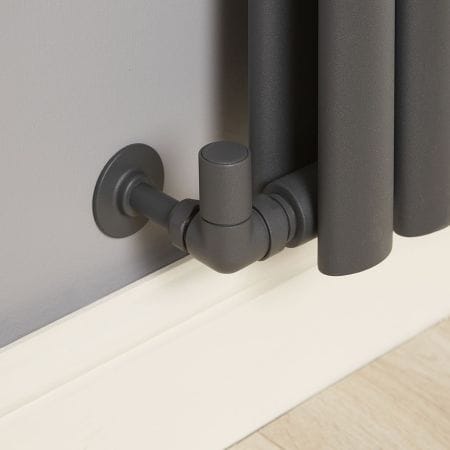
- Can you tee into the nearest flow and return pipes? The flow pipe carries hot water from the boiler, with the return carrying cooler water back to the boiler. Identify which is which, and check there is sufficient space to add a new connection without causing disruption to the existing system.
- Are the pipe materials and fittings compatible with your new radiator? Check the size, material and connection type and make sure they align with your radiator requirements. Consider the valve connections on the radiator, what the pipework is made of (copper will have different requirements to plastic, for example), the diameter, and whether the connection type is angled, straight or corner.
- Is your system sealed or open vented? The presence of a water tank in the loft or attic will usually indicate an open-vented system that works on a gravity-fed basis. No tank connected to the heating system suggests a sealed setup.
Older systems may have:
- Mixed pipe sizes (15mm vs 22mm)
- Steel pipework that’s difficult to cut
- Low-pressure setups that don’t suit high-output radiators
If you’re unsure, or the pipe layout looks like a plumber’s Jackson Pollock, call a professional heating engineer.

Installing a new radiator
Adding a radiator to an existing system can be a DIY-friendly task in many instances. If you’re confident, own the right tools, and understand how your system works.
DIY or professional radiator installation?
There are advantages and disadvantages to both types of radiator fittings. Let’s take a look:
DIY pros:
Cost-effective
Extra satisfaction for a job well done
No need to wait for availability
DIY cons:
Risk of leakage, cold spots or voided warranties
May require system draining (which can be a tiresome and faffy job)
Mistakes can prove costly
Professional pros:
Expert finish
Full system balancing included
A trained eye can spot other potential issues you might miss
Professional cons:
Higher upfront cost
Reputable plumbers may have significant waiting lists for work completion

The radiator installation process...
If you are still game to travel the DIY route, we’ve put together a simplified overview of the steps…
Tools & equipment checklist:
- Radiator, brackets, valves
- Pipe cutter or hacksaw
- Adjustable spanners
- PTFE tape
- Pipe fittings or compression joints
- Drill and wall plugs
- Radiator bleed key
- Buckets and towels
Step-by-step process:
You can find fully detailed instructions in our guide on how to fit a radiator, but as a brief overview…
- Plan layout and mark bracket positions and the centre radiator point on the wall
- Drain down the system (if necessary)
- Tee into pipework and run the flow/return lines to their new location
- Mount the radiator securely to wall using the relevant tools, and paying attention to your brackets and centre markings for accurate positioning
- Connect radiator valves to the radiator, ensuring correct positioning and clearance for corner or angled valves in particular
- Refill system, bleed air, and test for leaks to ensure your radiators are each working to full capacity
- Balance system so all radiators heat up evenly and provide a level amount of heat distribution across the system
Common radiator installation mistakes
This is where many go wrong, including seasoned DIY enthusiasts.
Ignoring BTU calculations: Don’t guess. Get it wrong and your room will remain chilly. Take care to input proper facts and figures into our BTU Calculator and use the results as the foundation of your radiator purchase decision.
Forgetting to balance the system: A new radiator can steal heat from others if you don’t make the necessary adjustments to lockshield valves. Make sure your system is correctly balanced and set up for even heat distribution throughout, prior to the installation of new radiators.
Cutting corners on pipework: Bodged joints will only lead to leaks down the line. Make sure pipework is correctly aligned and in full working order ready for your fresh radiator addition(s).
Skipping the pressure test: Before refilling, always test for leaks with a pressure tester or by slowly re-pressurising. Ideally, you want to achieve a reading between 1.0 and 1.5 bar with the heating turned off, and between 1.0 and 2.0 bar with the heating switched on, to ensure proper system function and eradicate possible leaks before your new radiator installation.
Overtightening valve connections: This can ultimately crack fittings or strip threads. You can tell the valve has been tightened enough when it stops turning with a spanner and you can hear a faint grinding of metal on metal due to olive compression.

Your heating upgrade checklist
Here’s your one-stop summary before you commit.
- Calculate BTU requirement for the room
- Check boiler capacity
- Assess condition and effectiveness of current radiators
- Decide on radiator style and location
- Confirm pipework access and compatibility
- Choose between DIY or professional installation
- Review full installation process
- Allow time for bleeding and balancing
- Test system thoroughly before putting your feet up
Is adding a radiator right for you?
If you’ve followed the steps above and ticked off the checklist, you’re probably ready to take the plunge. Adding a radiator can transform the look and comfort of your home, especially when done thoughtfully and backed up by expert planning.
Whether you’re seeking form, function, or a bit of both, BestHeating has everything you need to warm up in style.
Let us know all about your new radiator upgrades in the comments below, or through Instagram, Facebook or X.
John is a Research Specialist for the Best Heating Advice Centre, where for over nine years he has dedicated himself to demystifying home heating for our customers. He specialises in creating clear, data-driven guides and how-to articles by collaborating directly with our team of certified heating experts and product engineers.
His work, built on a foundation of journalistic research, has helped millions of readers make confident and informed decisions about their home heating. When he’s not breaking down the heat output differentials from radiators to heated towel rails, John fancies himself as a fine football and music connoisseur.